被chat gpt 修改润色过
访问ChatGPT需要使用“原生 IP”。所谓“原生 IP”是指网站的 IP 地址和其机房的 IP 地址是一致的。但很多 IDC 提供商的 IP 都是从其他国家调配来的。这导致我们即使翻墙了,使用美国的 VPS,但仍然访问不了相关服务。因此,我们需要使用 Cloudflare Warp 来访问这些网站。
安装 Warp
WARP 模式是 Cloudflare 提供的一种全局代理模式,是一个客户端的 VPN。它会将你的所有流量都通过 Cloudflare 的网络,这样就能访问到原生 IP 了。
我的 VPS 在 LA,貌似无法使用脚本中的warp,所以我使用的是 warp-go。
wget -N https://raw.githubusercontent.com/fscarmen/warp/main/warp-go.sh && bash warp-go.sh [option] [lisence]
开启了双栈模式之后,可以使用任意方法获取 IP,查看 IP 是否已经是 Cloudflare 的了。
curl ipinfo.io
curl ifconfig.me
curl ip.sb
curl api.ipify.org
{
  "ip": "104.28.227.186",
  "city": "Los Angeles",
  "region": "California",
  "country": "US",
  "loc": "34.0522,-118.2437",
  "org": "AS13335 Cloudflare, Inc.",
  "postal": "90009",
  "timezone": "America/Los_Angeles",
  "readme": "https://ipinfo.io/missingauth"
}
如果显示的是 Cloudflare,则说明已经成功了。
Gost 配置
Gost 是一个相对比较简单的配置,服务器和客户端都可以使用。为了让我们在手机上也能翻墙,使用 HTTPS 协议。
服务端
DOMAIN="example.com"
USER="username"
PASS="password"
# 由于我的服务器443端口已经被占用,所以用其他端口,正常情况下,https是建议使用默认的443端口的
PORT=8443
AUTH=$(echo -n ${USER}:${PASS} | base64)

BIND_IP=0.0.0.0
CERT_DIR=/etc/letsencrypt
CERT=${CERT_DIR}/live/${DOMAIN}/fullchain.pem
KEY=${CERT_DIR}/live/${DOMAIN}/privkey.pem

sudo docker run -d --name=gost \
    -v ${CERT_DIR}:${CERT_DIR}:ro \
    --net=host ginuerzh/gost \
    -L "https://${BIND_IP}:${PORT}?auth=${AUTH}&cert=${CERT}&key=${KEY}&probe_resist=code:404&knock=www.google.com"
客户端(Mac, Window, Linux):
当使用gost进行科学上网时,可以采用以下两种方式安装和配置gost。
1. 使用docker安装gost
Docker是一种轻量级容器技术,可以方便地进行软件的部署和管理。使用docker安装gost非常简单,只需要运行一条命令即可:
docker run -d --rm --name=gost \
	-p 90:1990 \
    -L=socks5://:1990 -F=https://usename:password@example.com:8443
这个命令中,-p 90:1990 表示容器监听端口90,映射到容器内gost 的1990 端口。
-d参数表示容器将在后台运行,--rm参数表示容器退出时自动删除。--name参数指定了容器的名称。
-L=socks5://:1990参数表示在本地监听1990端口,提供socks5代理服务。-F=https://usename:password@example.com:8443参数表示将所有的流量通过HTTPS协议转发到指定的服务器,usename和password分别是服务器认证的用户名和密码。
2. 手动编译安装gost
手动安装需要先安装 Go 语言环境。
git clone https://github.com/ginuerzh/gost.git
cd gost/cmd/gost
go build
接着,编写一个 start_gost.sh shell 脚本:
#/bin/bash

# Set the path to your log file
LOG_FILE=/Users/ericjin/log_gost.log

# Clear the log file
truncate -s 0 $LOG_FILE

# Run the gost command and redirect output to the log file
nohup gost -L=socks5://:1990 -F=https://usename:password@example.com:8443 >> $LOG_FILE 2>&1 &

# Get the process ID of the last background command (gost)
process_id=$!

# Check if the process ID is empty
if [ -z "$process_id" ]; then
  echo "Failed to start gost"
  exit 1
fi

# Output the process ID and a message indicating that gost has started
echo "gost has been started with PID $process_id"
exit 0
nohup 是一个 Unix/Linux 命令,它允许你在退出当前 shell 或关闭终端之后,也能让程序继续在后台运行。& 结尾表示让命令在后台运行。
$! 是 shell 的一个特殊变量,用于存储最后一个在后台运行的进程的进程 ID。在这个脚本中,当我们使用 nohup 命令启动 gost 进程时,会将其放在后台运行,此时 shell 会将 gost 进程的进程 ID 存储在 $! 变量中,我们可以通过 $! 变量获取到 gost 进程的进程 ID,以便后续操作。
为了让这个脚本在 Mac 开机的时候自动启动,您需要在 /Library/LaunchAgents/ 或 ~/Library/LaunchAgents/(针对每个用户的代理)目录中创建一个 .plist 文件。然后执行 launchctl 命令:
<?xml version="1.0" encoding="UTF-8"?>
<!DOCTYPE plist PUBLIC "-//Apple//DTD PLIST 1.0//EN" "http://www.apple.com/DTDs/PropertyList-1.0.dtd">
<plist version="1.0">
<dict>
   <key>Label</key>
   <string>com.example.start_gost</string>
   <key>ProgramArguments</key>
   <array>
      <string>/path/to/start_gost.sh</string>
   </array>
   <key>RunAtLoad</key>
   <true/>
</dict>
</plist>
launchctl load ~/Library/LaunchAgents/com.example.start_gost.plist
由于 gost 监听了本地的 1990 端口,因此你可以使用任何的 Shadowsocks 客户端软件将其设置为本地代理。
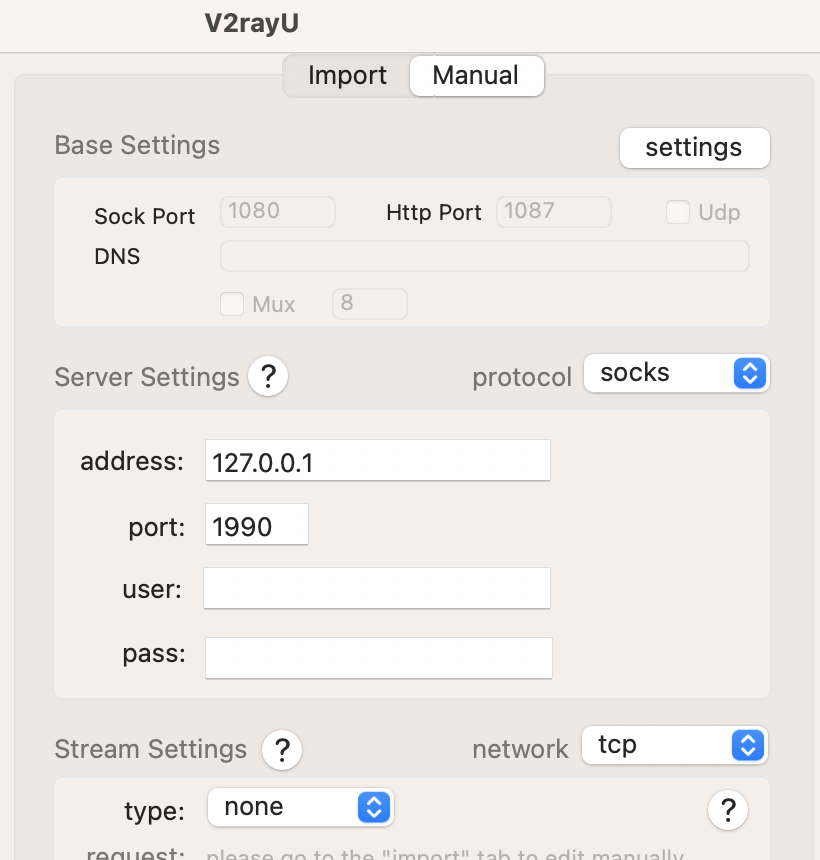
同时,你需要配置规则,以便使用 PAC 模式访问 ChatGPT 网站:
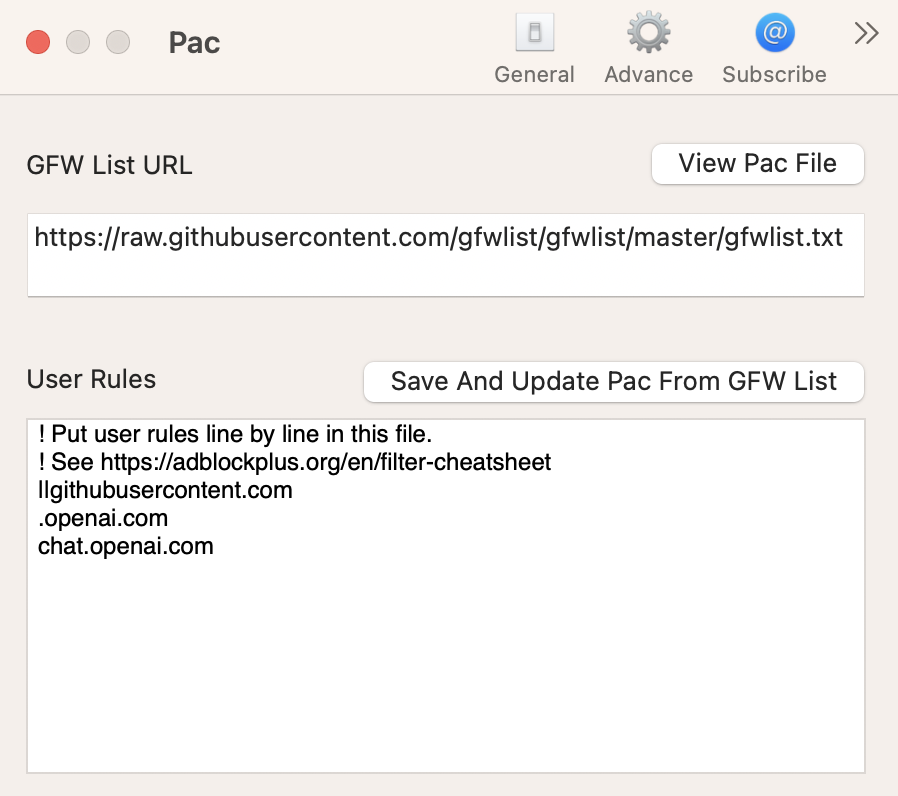
手机用户可以下载 Shadowrocket 应用并配置 HTTPS 节点。到此为止,您的网络就畅通无阻了!
参考资料:
- GitHub - fscarmen/warp: WARP one-click script. Add an IPv4, IPv6 or dual-stack CloudFlare WARP network interface and Socks5 proxy for VPS. 一键脚本
- GOST | GOST v2
- GitHub - haoel/haoel.github.io